
Setting up an Application Load Balancer with AWS EC2
#90 Days of DevOps Challenge - Day 41


What is Load Balancing?
Load balancer is a service that uniformly distributes the network traffic and workloads across multiple servers or a cluster of servers. Load balancer increases the availability and fault tolerance of an application
It is an essential aspect of any large-scale and scalable computing system, as it helps you to improve the reliability and performance of your applications.
Elastic Load Balancing(ELB):-
Elastic Load Balancing automatically distributes your incoming traffic across multiple targets, such as EC2 instances, containers, and IP addresses, in one or more Availability Zones. It monitors the health of its registered targets, and routes traffic only to the healthy targets. Elastic Load Balancing scales your load balancer capacity automatically in response to changes in incoming traffic.
Elastic Load Balancing has 3 types :-
Application Load Balancer (ALB):-

This type of Load Balancer is used when decisions are to be made related to HTTP and HTTPS traffic routing. It supports path-based routing and host-based routing. This load balancer works at the Application layer of the OSI Model. The load balancer also supports dynamic host port mapping.
operates at layer 7 of the OSI model and is ideal for applications that require advanced routing and microservices.
Network Load Balancer (NLB):-

This type of load balancer works at the transport layer(TCP/SSL) of the OSI model. It’s capable of handling millions of requests per second. It is mainly used for load balancing TCP traffic.
operates at layer 4 of the OSI model and is ideal for applications that require high throughput and low latency.
Classic Load Balancer (CLB):-
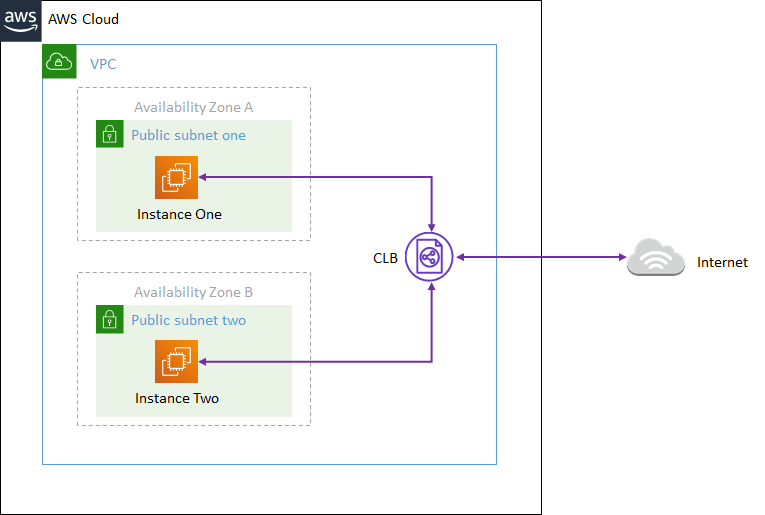
AWS Classic Load Balancer (CLB) more closely resembles traditional load balancing, but virtual devices replace physical hardware to evenly distribute your incoming requests and ensure a clean, fast user experience.
operates at layer 4 of the OSI model and is ideal for applications that require basic load balancing features.
Deploying a PHP website using ALB
Task 1:
Launch 2 EC2 instances with an Ubuntu AMI and use User Data to install the Apache Web Server.
Modify the index.html file to include your name so that when your Apache server is hosted, it will display your name also do it for 2nd instance which includes " TrainWithShubham Community is Super Awesome :) ".
Copy the public IP address of your EC2 instances.
Open a web browser and paste the public IP address into the address bar.
You should see a webpage displaying information about your PHP installation.
Step 1:- First we navigate to AWS and click on Instances-> Launch instance

Step 2:- Now we need to select the instance type and key pair and Network Settings


Step 3:- After that click on Advance details-> User data and install and start the Apache web server .installation steps will be mentioned in user data and the Number of instances should be 2 click on launch instance
#!/bin/bash
sudo apt-get update
sudo apt-get install apache2 -y
sudo systemctl start apache2
sudo systemctl enable apache2

Step 4:- After some time we can verify both servers and up and running and the Apache server should running . Let's verify


Step 5:- Now we need to modify both servers index.html files based on project requirement and need to go to "/var/www/html" path and edit index.html
cd /var/www/html
ls
vi index.html


Step 6:- Now we need to copy the Public IP address for both servers and paste it in browser. Page should refelect.


Task 2:
Create an Application Load Balancer (ALB) in EC2 using the AWS Management Console.
Add EC2 instances that you launch in task-1 to the ALB as target groups.
Verify that the ALB is working properly by checking the health status of the target instances and testing the load-balancing capabilities.
Step 1:- We need to create an Application Load Balancer. first, we need to click on Target Groups-> Create target Groups

Then we need to give the target group name

After clicking on next We need to select both servers/instances and need to click on include as pending below once we clicked it will come in below and click on create target group


Now we can see that target group created and both servers associated with this

Step 2:- we need to click on Load Balancers -> Create load balancer

Step 3:- Since we need to create application load balancer so we need to select that and click on create

Step 4:- In the Basic configuration we need to select load balancer name

And Network Mapping need to choose at least 2 subnets

We need to select Security Groups

in Listeners we need to select the target group which we have created and click on create load balancer

Step 5:- Now after some time we can see the load balancer will up and we need to select the DNS name and search it browser depending upon the traffic,load balancer will handling with 2 server


Note:- If we need to delete then first need to delete the load balancer-> target groups-> instances/servers
Thank you for reading!! I hope you find this article helpful!!
if any queries or corrections to be done to this blog please let me know.
Happy Learning!!
Saikat Mukherjee