Launching your Kubernetes Cluster with Deployment
#90 Days of DevOps Challenge - Day 32

Welcome here. This is Saikat currently working as a Software Engineer with a total experience of 2+ in the IT industry. Am passionate about learning DevOps and wanted to deep dive into tools like Kubernetes, EKS, Docker , Ansible , Terraform etc.
Deployment in K8s
In real world thing starts from here, we write deployment to launch Pods. A Deployment provides declarative updates for Pods and ReplicaSets.
A Deployment is a Kubernetes object that acts as a wrapper around a ReplicaSet and makes it easier to use.
In order to manage replicated services, it's recommended that you use Deployments that, in turn, manage the ReplicaSet and the Pods created by the ReplicaSet.
The major motivation for using a Deployment is that it maintains a history of revisions.
Every time a change is made to the ReplicaSet or the underlying Pods, a new revision of the ReplicaSet is recorded by the Deployment.
This way, using a Deployment makes it easy to roll back to a previous state or version. Keep in mind that every rollback will also create a new revision for the Deployment
Example of NGINX Deployment:-
apiVersion: apps/v1
kind: Deployment
metadata:
  name: nginx-deployment
  labels:
    app: nginx
spec:
  replicas: 3
  selector:
    matchLabels:
      app: nginx
  template:
    metadata:
      labels:
        app: nginx
    spec:
      containers:
      - name: nginx
        image: nginx:1.14.2
        ports:
        - containerPort: 80
Components of Deployment:-
The value for the kind field is Deployment. The rest of the configuration remains the same as that for ReplicaSets. Deployments also have the replicas, selector, and Pod template fields used in the same way as ReplicaSets.
Strategy:- In the strategy field under spec, we can specify which strategy the Deployment should use when it replaces old pods with new ones. This can either be RollingUpdate or Recreate. The default value is RollingUpdate.
Rolling Update:-
This is a strategy used to update a Deployment without having any downtime.
With the RollingUpdate strategy, the controller updates the Pods one by one.
Hence, at any given time, there will always be some Pods running.
This strategy is particularly helpful when you want to update the Pod template without incurring any downtime for your application.
However, be aware that having a rolling update means that there may be two different versions of Pods (old and new) running at the same time.
maxUnavailable is the maximum number of Pods that can be unavailable during the update.
maxSurge is the maximum number of Pods that can be scheduled/created above the desired number of Pods (as specified in the replicas field).
The two parameters—maxUnavailable and maxSurge—can be tuned for availability and the speed of scaling up or down the Deployment.
Recreate:-
In this strategy, all the existing pods are killed before creating the new Pods with an updated configuration.
This means there will be some downtime during the update.
This, however, ensures that all the Pods running in the Deployment will be on the same version (old or new).
UseCase:- A good use case for using the Recreate update strategy is if we need to run some data migration or data processing before the new code can be used. In this case, we will need to use the Recreate strategy because we can't afford to have any new code running along with the old one without running the migration or processing first for all the Pods.
Rolling Back a Deployment:-
In a real-life scenario, you may make a mistake when making a change in the Deployment configuration.
You can easily undo a change and roll back to a previous stable revision of the Deployment.
use the kubectl rollout command to check the revision history and rollback
Basic commands for Deployment:-
# Using the below command we can get the deployments
kubectl  get  deployments
# Using the below command To see the Deployment rollout status
kubectl rollout status deployment/<Deployment_Name>
# Using the below command To Change the image name
kubectl set image deployment/<Deployment_Name> <new_name>
# Using the below command we can edit live running file
kubectl edit deployment/<Deployment_Name>
# Using the below command To see the rollout status
kubectl rollout status deployment/<Deployment_Name>
# Using the below command to check in details
kubectl describe deployments
# Using the below command Checking Rollout History of a Deployment
kubectl rollout history deployment/<Deployment_Name>
# Using the below command Rolling Back to a Previous Revision
kubectl rollout undo deployment/<Deployment_Name>
# Using the below command Scaling a Deployment
kubectl scale deployment/<Deployment_Name> --replicas=10
# Using the below command to set the resources
kubectl set resources deployment/<Deployment_Name> -c=nginx --limits=cpu=200m,memory=512Mi
Task 1: Create one Deployment file to deploy a sample todo-app on K8s using the "Auto-healing" and "Auto-Scaling" feature
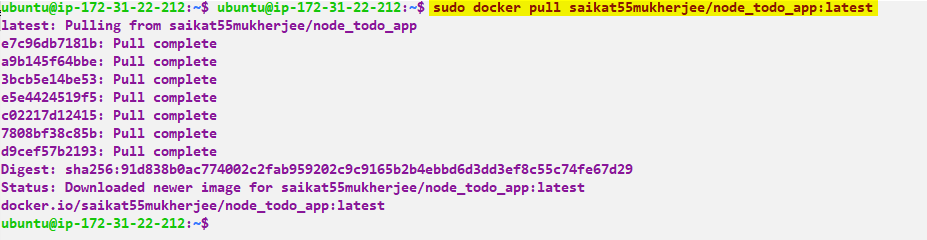
Step 1:- I have already a docker image in the docker hub for a sample todo- app. Now we need to pull the the image from docker hub by running the below command
sudo docker pull saikat55mukherjee/node_todo_app:latest

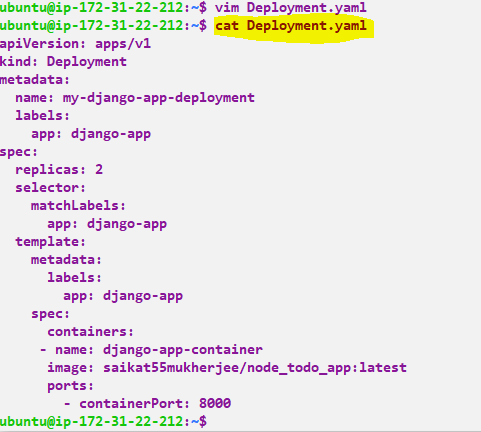
Step 2:- Then create a Manifest file named deployment.yaml where all the configuration related to the image will store.
 apiVersion: apps/v1
 kind: Deployment
 metadata:
   name: my-django-app-deployment
   labels:
     app: django-app
 spec:
   replicas: 2
   selector:
     matchLabels:
       app: django-app
   template:
     metadata:
       labels:
         app: django-app
     spec:
       containers:
       - name: django-app-container
         image: saikat55mukherjee/node_todo_app:latest
         ports:
         - containerPort: 8000
Step 3:- Now we have to create the deployment using the below command
kubectl apply -f deployment.yaml

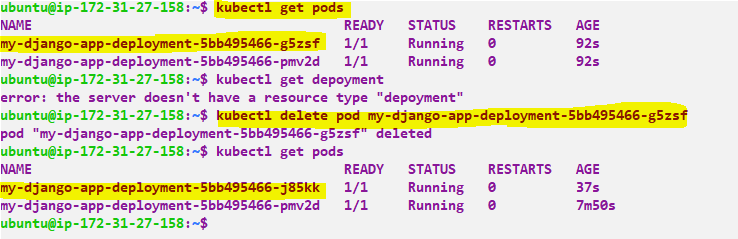
Step 4:- Now we can verify whether the pods are running or not by following the below command
kubectl get pods

Step 5:- Now after deleting a pod still get 2 pods as Auto Healing is working, so even though 1 pod is removed or deleted a new pod is replaced with the older one.
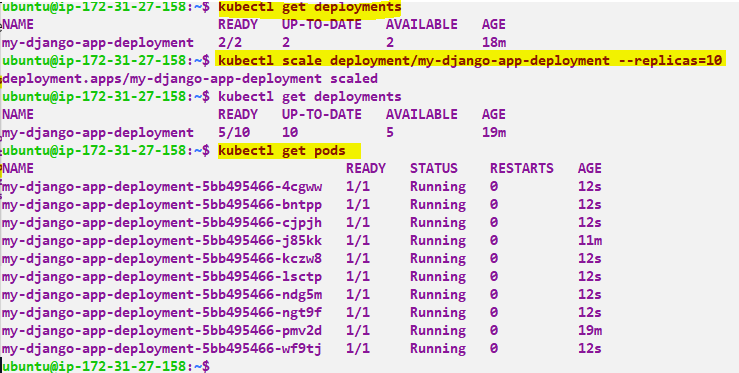
Step 6:- Now if we want to scale up and scale down, Can do it using below command
kubectl scale deployment/my-django-app-deployment --replicas=10
Step 7:- Now if we need to delete deployment we can use the below command
kubectl delete -f deployment.yaml

Thank you for reading!! I hope you find this article helpful!!
if any queries or corrections to be done to this blog please let me know.
Happy Learning!!
Saikat Mukherjee


