
Namespaces and Services in Kubernetes
#90 Days of DevOps Challenge - Day 33


What is a Namespace?
You can think of a Namespace as a virtual cluster inside your Kubernetes cluster. You can have multiple namespaces inside a single Kubernetes cluster, and they are all logically isolated from each other. They can help you and your teams with organization, security, and even performance!
In most Kubernetes distributions, the cluster comes out of the box with a Namespace called “default.” In fact, there are actually three namespaces that Kubernetes ships with: default, kube-system (used for Kubernetes components), and kube-public (used for public resources). Kube-public isn’t really used for much right now, and it’s usually a good idea to leave the kube-system alone
Functionality of Namespace:-
Following are some of the important functionalities of a Namespace in Kubernetes −
Namespaces help pod-to-pod communication using the same namespace.
Namespaces are virtual clusters that can sit on top of the same physical cluster.
They provide logical separation between the teams and their environments.
Commonly Used Commands for Namespace
#Below command use to create namespace
kubectl create –f namespace.yml
#Below command use to see all the namespace
kubectl get namespace
#Below command use to see particuar namespace
kubectl get namespace <Namespace name>
# Below command use to see in the deatils for any namespace
kubectl describe namespace <Namespace name>
# Below command use to delete namespace
kubectl delete namespace <Namespace name>
Task 1:-
Create a Namespace for your Deployment
Use the command
kubectl create namespace <namespace-name>to create a Namespace
kubectl create namespace my-app

kubectl get namespace

- Update the deployment.yml file to include the Namespace
apiVersion: apps/v1
kind: Deployment
metadata:
  name: my-django-app-deployment
  namespace: my-app
spec:
  replicas: 4
  selector:
    matchLabels:
      app: django-app
  template:
    metadata:
      labels:
        app: django-app
    spec:
      containers:
      - name: django-app-container
        image: saikat55mukherjee/node_todo_app:latest
        ports:
          - containerPort: 8000

- Apply the updated deployment using the command:
kubectl apply -f deployment.yml
kubectl apply -f deployment.yaml

- Verify that the Namespace has been created by checking the status of the Namespaces in your cluster.
kubectl get pods -n=<name_of_namespace>
 # Ex:- kubectl get pods -n=my-app

Task 2:- Explain about Services, Load Balancing, and Networking in Kubernetes
Services:-
A Service is an object (the same way that a Pod or a ConfigMap is an object). You can create, view or modify Service definitions using the Kubernetes API. Usually, you use a tool such as kubectl to make those API calls for you.
For example, suppose you have a set of Pods that each listen on TCP port 9376 and are labelled as app.kubernetes.io/name=MyApp. You can define a Service to publish that TCP listener:
apiVersion: v1
kind: Service
metadata:
  name: my-service
spec:
  selector:
    app.kubernetes.io/name: MyApp
  ports:
    - protocol: TCP
      port: 80
      targetPort: 9376
What are the components of a Kubernetes services?
Kubernetes services connect a set of pods to an abstracted service name and IP address. Services provide discovery and routing between pods. For example, services connect an application front-end to its backend, each of which running in separate deployments in a cluster. Services use labels and selectors to match pods with other applications. The core attributes of a Kubernetes service are:
A label selector that locates pods
The clusterIP IP address and assigned port number
Port definitions
Optional mapping of incoming ports to a targetPort
Services can be defined without pod selectors. For example, to point a service to another service in a different namespace or cluster.
What are the types of Kubernetes services?
ClusterIP. Exposes a service which is only accessible from within the cluster.
NodePort. Exposes a service via a static port on each node’s IP.
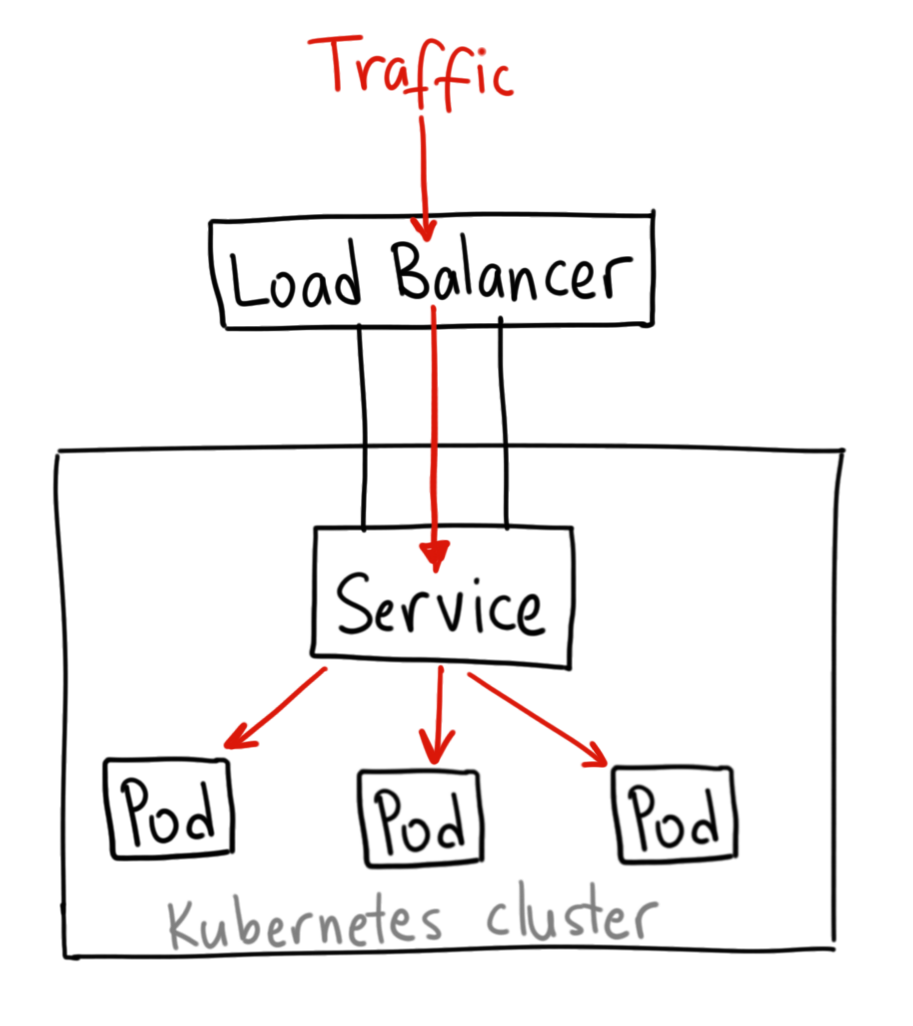
LoadBalancer. Exposes the service via the cloud provider’s load balancer.
ExternalName. Maps a service to a predefined externalName field by returning a value for the CNAME record.
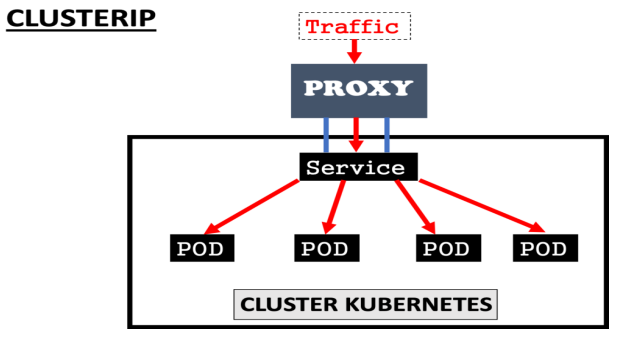
ClusterIP
This is the default service type that exposes the service on a cluster-internal IP by making the service only reachable within the cluster.
A Cluster service is the default Kubernetes service. It gives you a service inside your cluster that other apps inside your cluster can access.
There is no external process.
Example:-
nano my-service.yaml

apiVersion: v1
kind: Service
metadata:
  name: my-service
spec:
  type: ClusterIP
  ports:
    - targetPort: 80
      port: 80
  selector:
    app: nginix
    environment: porduction
NodePort
This exposes the service on each Node’s IP at a static port. Since a ClusterIP service, to which the NodePort service will route, is automatically created. We can contact the NodePort service outside the cluster.
A Nodeport service is the most primitive way to get external traffic directly to your service.
NodePort, as the same implies, opens a specific port on all the Nodes (the VMs), and any traffic that is sent to this port is forwarded to the service.
Note that the NodePort Service has a lot of downsides:
you can only have one service per port
you can only use ports 30000–32767,
if your Node/VM IP address changes, you need to deal with that.
That’s why it’s not recommended for production use cases

Example:-
nano my-service.yaml

apiVersion: v1
kind: Service
metadata:
  name: my-service
spec:
  type: NodePort
  ports:
    - targetPort: 80
      port: 80
      nodePort: 32023
  selector:
    app: nginix
    environment: porduction
LoadBalancer
Kubernetes is an extensible, portable, open-source platform for managing containerized services and workloads. Its large, rapidly growing ecosystem facilitates both automation and declarative configuration and Kubernetes support and tools are widely available.
Kubernetes load balancing makes the most sense in the context of how Kubernetes organizes containers. Kubernetes does not view single containers or individual instances of a service, but rather sees containers in terms of the specific services or sets of services they perform or provide.
In Kubernetes the most basic type of load balancing is load distribution. Kubernetes uses two methods of load distribution. Both of them are easy to implement at the dispatch level and operate through the kube-proxy feature. Kube-proxy manages virtual IPs for services.
The default kube-proxy mode for rule-based IP management is iptables, and the iptables mode native method for load distribution is random selection. Previously, kube-proxy default mode was userspace, with its native method for load distribution being round-robin.
There are several cases when you might access services using the Kubernetes proxy:
Allowing internal traffic
Connecting directly to them directly from a computer
Debugging services
Displaying internal dashboards
However, you should not use this method for production services or to expose your service to the internet. This is because the kube proxy requires you to run kubectl as an authenticated user.
In any case, for true load balancing, Ingress offers the most popular method. Ingress operates using a controller with an Ingress resource and a daemon. The Ingress resource is a set of rules governing traffic. The daemon applies the rules inside a specialized Kubernetes pod. The has its own sophisticated capabilities and built-in features for load balancing and can be customized for specific vendors or systems.
Example:-
apiVersion: v1
kind: Service
metadata:
  name: myservice
spec:
  ports:
  - name: web
    port: 80
  selector:
    app: web
  type: LoadBalancer
my-service                                LoadBalancer   100.71.69.103   <pending>     80:32147/TCP                 12s
my-service                                LoadBalancer   100.71.69.103   a16038a91350f45bebb49af853ab6bd3-2079646983.us-east-1.elb.amazonaws.com   80:32147/TCP                 16m
Networking
Networking in any architecture or technology is very essential to understand if you want to deploy the applications over the network and also understanding how the network works that will help you to troubleshoot if you have any network issue. So we must know exactly what is happening in the network and how all the connections are establishing for the communication over the network.
This is a basic Kubernetes architecture where you have some worker nodes, and few pods are running on it with a couple of containers. When you have these many components, how all these components are establishing its connection to make the application accessible over the network? The answer is that happens only through kubernetes networking.
3 things we need to remember:-
All the NODES in the K8s cluster should talk to each other
All the PODS in K8s cluster should communicate with each other without NAT
Every POD its OWN Ip address
Thank you for reading!! I hope you find this article helpful!!
if any queries or corrections to be done to this blog please let me know.
Happy Learning!!
Saikat Mukherjee